Wogga Stitches 1
Time for a bit of a catch-up on stitch combinations. The idea of using the Wogga as a sampler is good - just it means I am not going to pull out failures to make perfect. And you get to see the combinations here in all their imperfections.

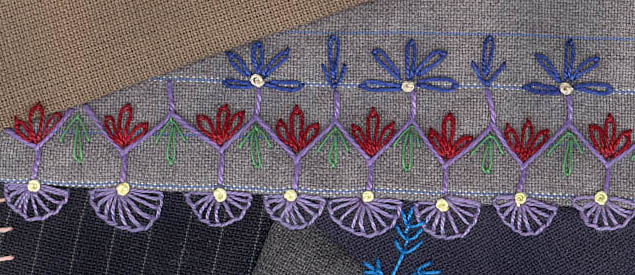
The one above is straight out of my brain - using the lines let me put very big Cretan stitch fairly evening (perle #8), all the rest except the green (Dentelles) and yellow is perle #12. The trick with this was getting the half flowers every second arm, which let them fit in, and use the white line for emphasis.

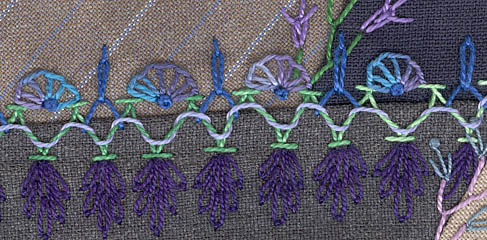
This is another of mine - just doodling as I went. I have used the stacked lazy daisy (dark blue, bottom) before, and it doesn't show up all that well. I am definitely moving towards dark on light and light on dark for these blocks. The lacing of the Chevron (blue on green in middle) was a last-minute thing, as it just looked too naked.

This was my first attempt to replicate a stitch from the Davis jigsaw quilt - except the mauve French knot is mine. The stitches to either side of the lazy daisy are Pistil stitch (a French Knot that "migrates") and what I learned was that, to get them facing the different directions, I had to wind the French Knot a different way each side. Not easy. Needs more work. This is where I realised perle #8 was too big and bulky for small stitches, so the Fly stitch at the bottom is perle #12.
Think I will persist with the top bit in perle #8, as it bulks up the French Knot. Just I will have to make them Lazy Daisy (aka Detached Chain) a bit larger and spaced out more.

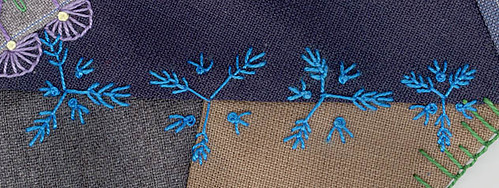
This is my most recent attempt to get a stitch combination out of the Davis quilt. The problem with the picture is that it is upside down to the way I worked. I started on the right-hand side of this picture - can't you tell! First I tried to eyeball the size. No way! Then I tried the handle of a knife as a gauge. Then, on the final one, I was using a see-through ruler to measure. I am about to chop up a plastic ruler so I can use it all the time.
Edna Force Davis obviously liked this combination, and used it a few times. And in the little detached bits, she closed her Fly Stitch with a French Knot. Interesting. I have something in the back of my mind about Tete de Boeuf Stitch, but I cannot find it in Sharon's Stitch Dictionary under that name, or Bull Stitch - but this reminds me of the glimpse I once had of that, somewhere.
Off I go to Google - and I found it on Rissa's Pages. And no - that wasn't it.
My DH says I ramble - he is right. It is he who has been enjoying himself saying "don't forget to get the perle #12" as I go out. Smarty just wants to pretend he understands sewing. I have mentioned before that his mother was a dressmaker, but while I was in Melbourne a couple of days ago, he was at the records office chasing his father's mother's will. And is he chortling. Despite being a woman of some property, what was the absolute first bequest in her will? Her Singer sewing machine, to say which daughter was to get it.
So although he cannot remember his father having a bag needle (he was bricklayer, you cannot sew bricks together), he is claiming an impeccable pedigree for sewing on both sides. And he says all the bonds and patterns used in bricklaying are just like stitch combinations for blokes.
And yes - I ramble. I need coffee.


2 Comments:
I am loving watching the progress here. This format totally showcases the stitches: nowhere to hide! I think "Doodling" is so conducive to good work, too...
Funny the stories about your husband commenting. Mine does that too! Mostly he looks at my quilts from the perspective of the woodworker that he is: "that line is so crooked!" or, "nice mitered corner".....men are endearing, aren't they?
hi Linda,
you'll find the Tete De Boeuf stitch under library in Needlecrafter.com
I recently learnt a technique called metal embossing. A design drawn on an aluminum sheet is embossed on the reverse using a wooden spoon. I is hard painful work because the sheet is atleast 2mm thick. I completed the embossing part after nearly a week of being at it every spare minute.
i left it on the table and went out. I could not find it when I came back. Guess what DH had done. As the sheet was curled (as any metal sheet naturally would), he put it under a couple of mattresses to straighten it out!!! Naturally, I had to do the embossing all over again. Husbands are endearing when they make themselves a nuisance trying to help!
Post a Comment
<< Home