Fan Piecing
My class and I have been experimenting with fan piecing before a Fan Round Robin starts soon. This is how I am currently doing six inch blocks, although there are others ways.
Firstly, I would cut an 8" foundation block, and draw the six inch square front and back. (I didn't this time, I pieced them like this - I wouldn't do it again).
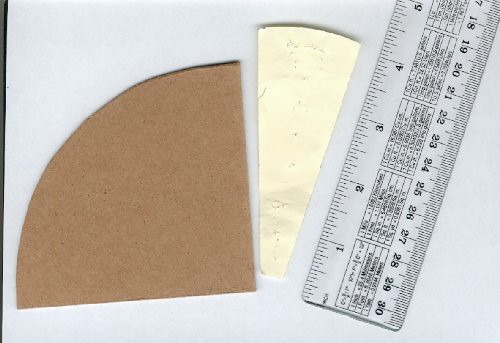
Step 1 - make a template for the whole fan, and for the segments. I did mine by trial and error, and note the segments are slightly longer than the fan. The fan is light cardboard, the segment paper.
Step 2 - piece the centre and three corners of a block, use the cardboard template to mark where the fan will go, and trim back. Turn over to the back and use the line drawn there to tack around the six-inch line, which will be your seamline.
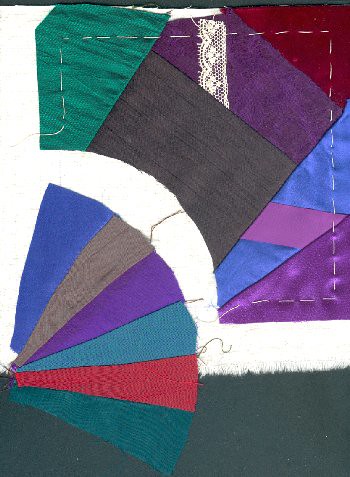
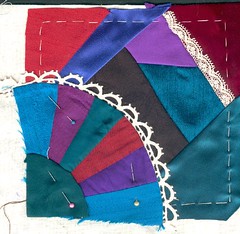
Step 3 - cut six (in this case) segments and join them as a fan off foundation. (I actually cut them out two at a time, by pinning the paper on - double thickness, it cuts better. I then have a heap of segments to mix and match). You can sew lace into the segments as you go, but it needs to be fairly fine - like this.
Neaten up around top of fan if needed. You are then to this point:
Step 4 - place fan on block, with point of fan just inside seam line, if you are putting a patch at the point; move lower and leave a seam allowance if you are not. Pin down, turn over and tack along seam line on back to hold fan.
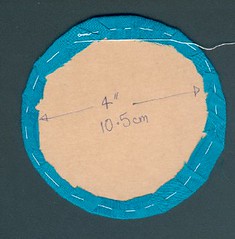
Step 5 - go into your kitchen and find a pleasing circle - this one is a ramikin four inches in diameter. Cut a circle of light cardboard and then a circle of fabric one centimetre wider than your circle all round. Tack around the outside of the fabric and gather so the cardboard is in the pouch in the middle. Press from both sides, and you are to this stage:
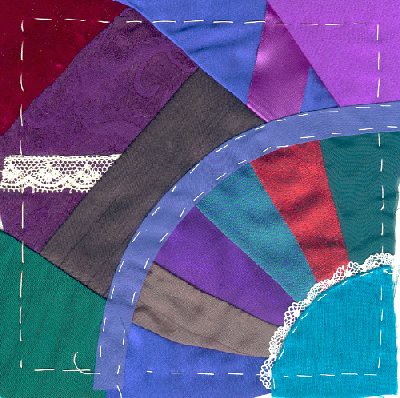
Step 6 - remove cardboard from the circle, press again (just to be sure). Cut circle in half, then in half again. Reserve one quarter and the half for future use (who knows when you will make a half circle fan, like this, rather than a quarter circle one. Take one quarter and tack it down in the point of the fan - adding some lace if you wish. For tacking the point/corner, turn over and follow the six-inch line drawn on the back.
Step 7 (which can be done before step 6 - no drama). Cut the right length of cotton bias tape and tack down around the raw edge - adding lace under the bias at the top edge if you wish.
Lace Note: some lace needs to be lightly gathered for fans - especially if there is a straight line rather than a "toothed" finish on one side - if you know what I mean. I find some coarser laces need less gathering - see below.
And that's it - your block is ready to send off. Those in the round robin will know very obvious tacking like this is designed to be removed, but do include that note in your RR book. And make sure you use nice, contrasty thread, so it is easy to see and remove.
One of those fan seams (on the left) is a bit wonky - but I am sure someone will sew something over it in the RR. Looks like a good place for a spray of flowers!
Variation:
Follow steps 1 to 3
Before you place the fan on the block, cut a length of lace (lightly gathering if necessary) and place it around the top of the fan right sides together - just like flip-and-sew. Machine lace to fan. Open out and press, so the raw edges are turned under the fan.
Tack fan to the block and follow instructions above for adding the quarter circle in point if desired, it then looks like this:
The lace in this case was a very coarse one that did not need gathering, and eased well around the curve.
In fact, I reckon anyone can make a heap of these small fans, with or without the lace, and have them handy to just add to blocks as you go - either by appliquing on top or by piecing into seams.
Once upon a time I used to make the fans by flipping and sewing direct onto the foundation, but had trouble dealing with the raw edge and adding lace in the variation above. But you can piece direct onto the foundation if you are using the bias to cover the raw edge. It just takes a bit of trial and error to work out where to put the bits.
So I like this one.


2 Comments:
What a fantastic job of illustrating that! Thanks for the tips! :-)
Hmmm, maybe I'll have to do a second round robin so I can try it! LOL!
Have found several good hints thanks chloe;Previously having constructed a (traditional) fan quilt in a Grandmothers garden path setting,I'd NEVER ever again try piecing the segments without a foundation backing.
That bias binding surely beats needle turning the ends(curved or pointed) of the fan!!
Post a Comment
<< Home