Sunday 31 July 2005

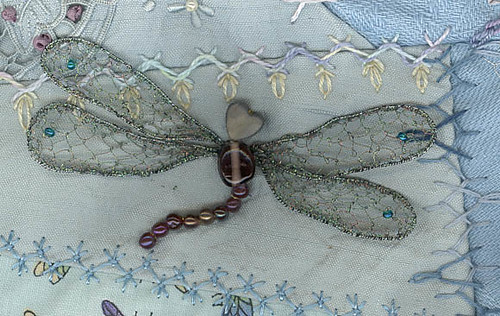
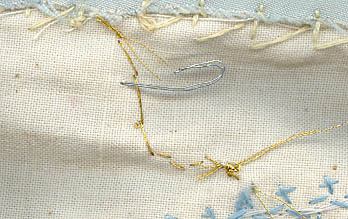
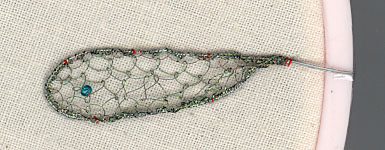
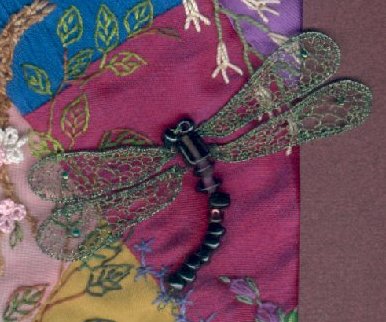
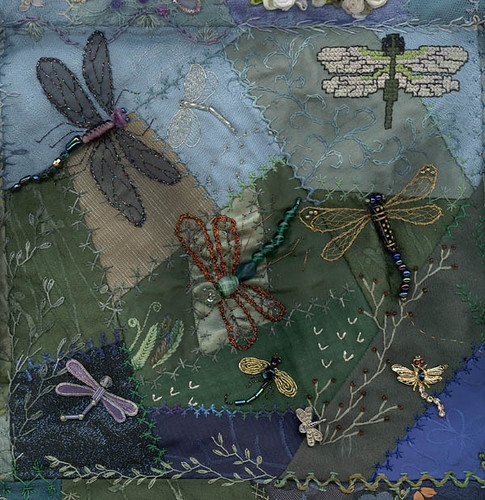
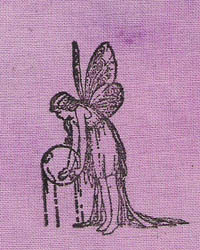
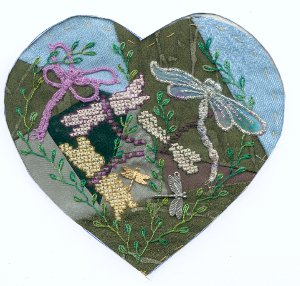
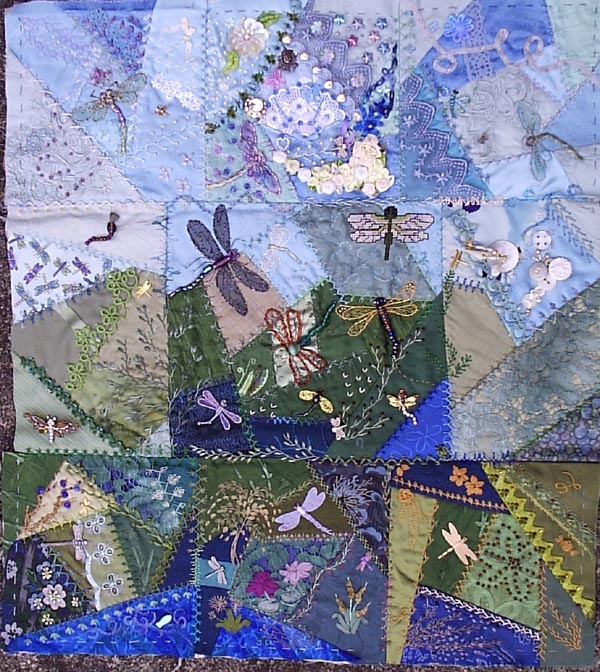
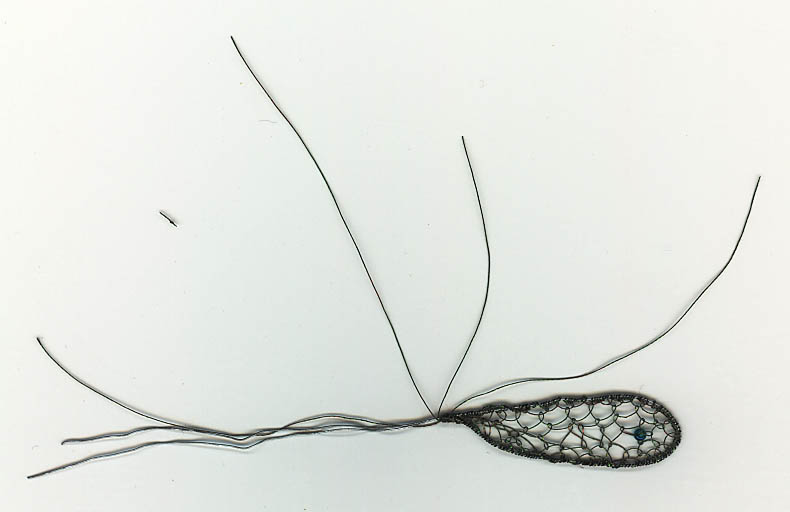
Dragonfly Wings Finished

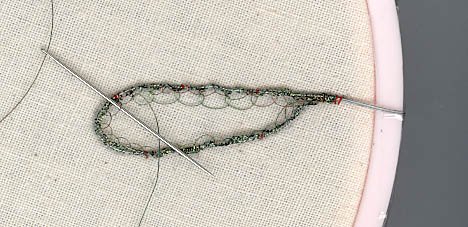
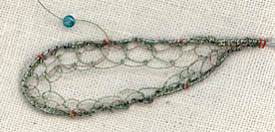
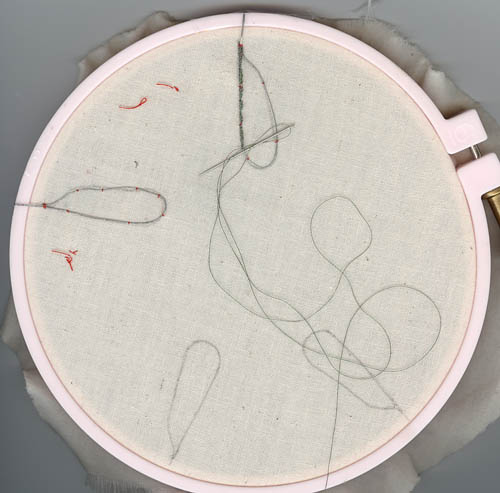
The wings are finished on this Dragonfly - I am just still thinking about its eyes.

Dragonfly1

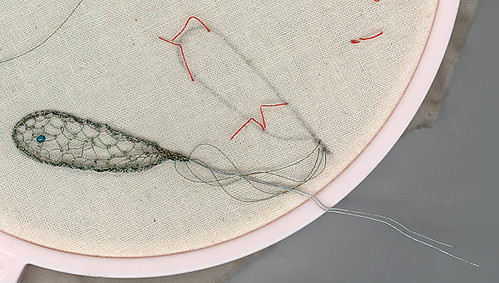
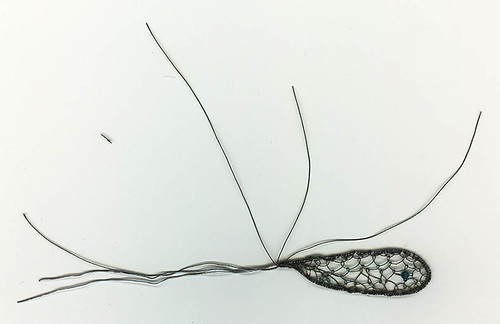
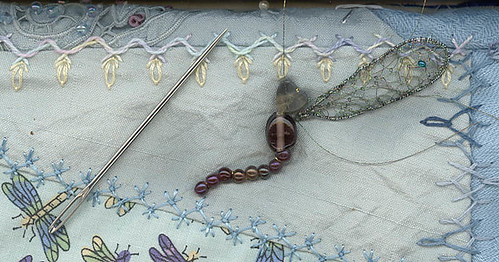
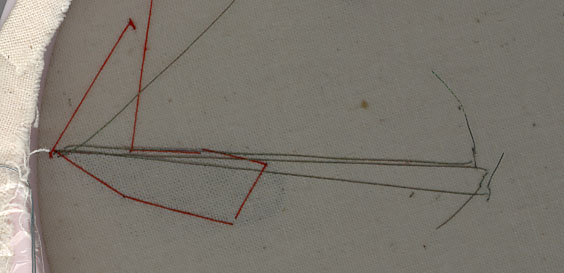
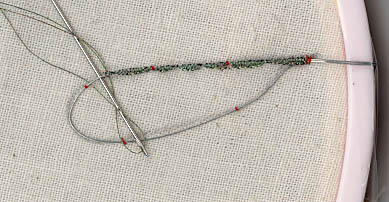
Steps in the construction can be found by scrolling down - they are in three places.

Just a couple of points:

The exact thread is YLI "Reflections" (a metallic machine thread), called Black (even though it is dark green.

The whole work is two long threads, which can be difficult to manage - it is worth often running the needle right up the thread to the fabric surface, holding the needle and letting the whole thread drop to untangle.

Now I have got to this stage, I will actually tack the wings down to the fabric with a couple of very large stitches while I finish the rest of the work and mount it - just to protect them a little.

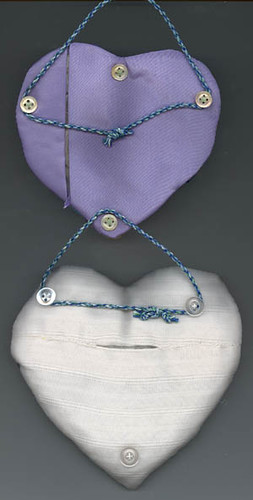
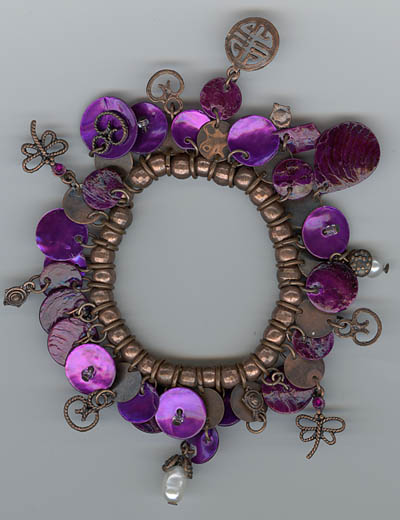
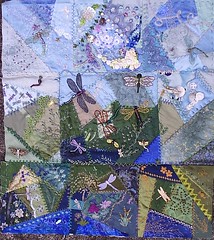
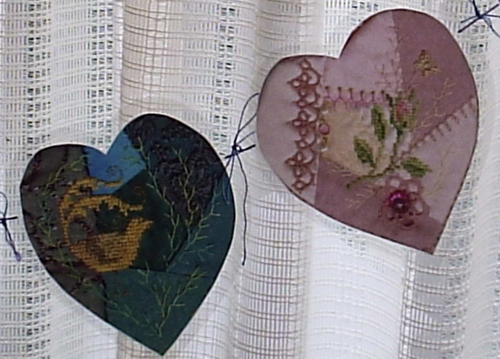
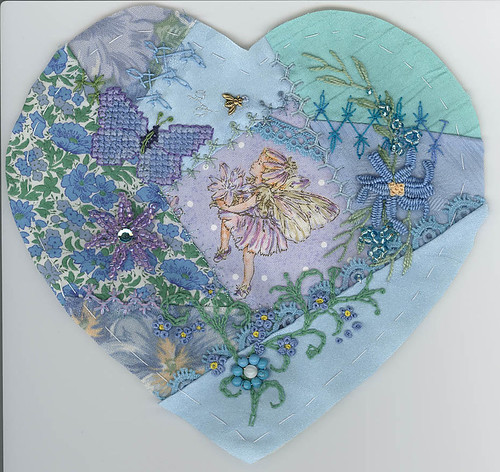
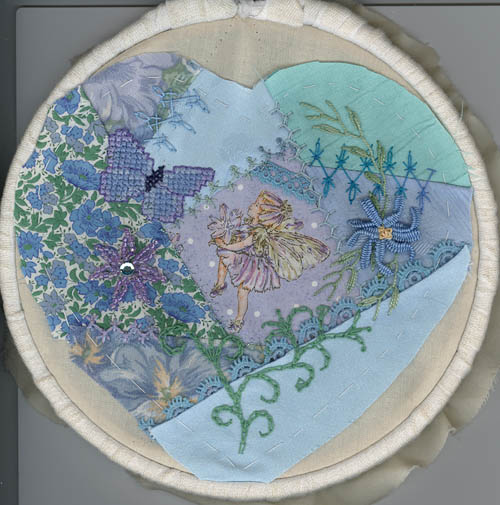
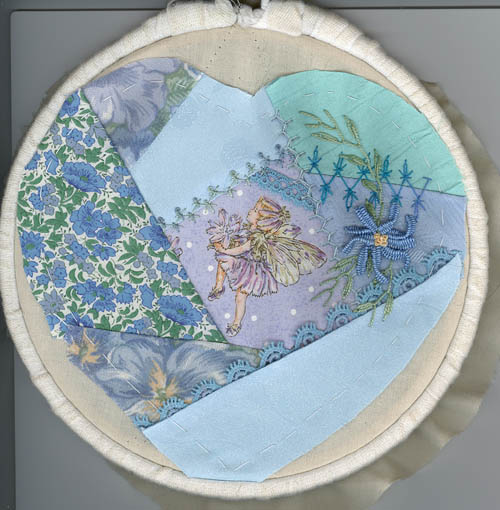
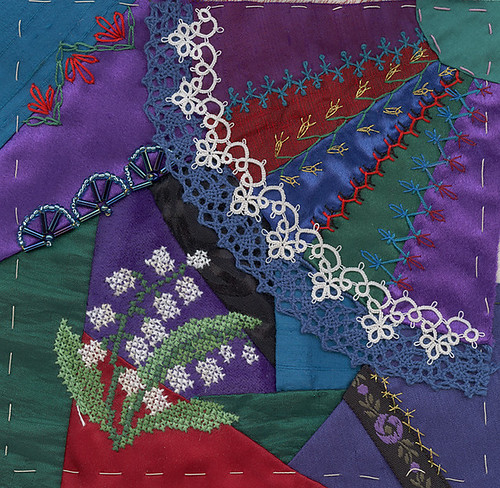
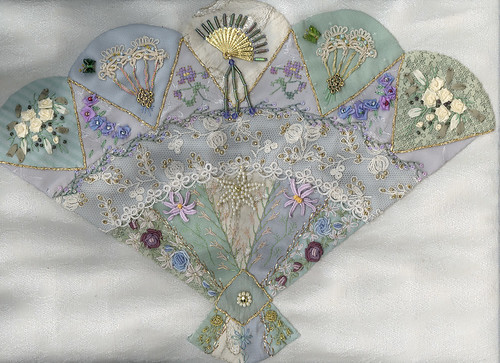
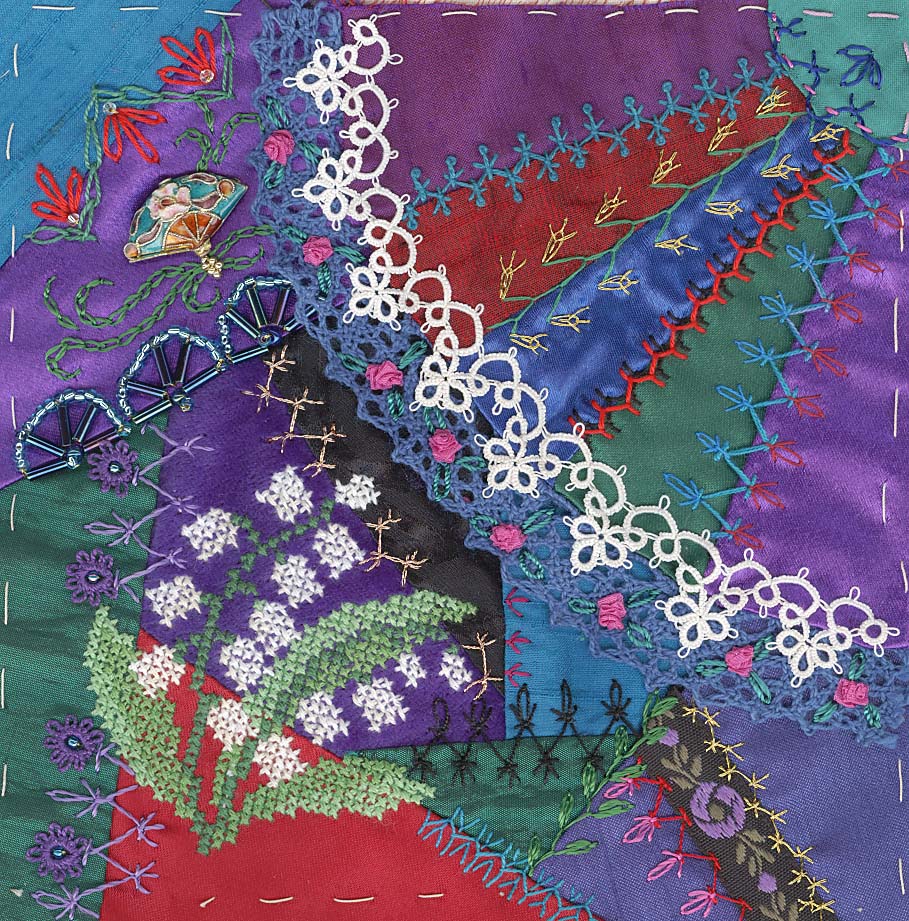
Not that there is a lot more to be done - the end is in sight for this UFO. If you look at this link, this dragonfly is on the lefthand side, in the middle section - you can just see its body before the wings were added.

More than worth a Click

Do have a peek at a stunning piece of embellished quilting at The Madonna Idea - and then scroll down and enjoy the process.

I'm off back there - I haven't near finished looking yet!

Saturday 30 July 2005

Chain in Progress

Six of my ten Hearts from the Chains of Hearts, have now been made up:

Chain in Progress

These are from MaureenI, Rosemary, Juliette, Dawn, Chris and Leisa.

I am still working on the hanging threads - ordinary perle cotton seems best, but isn't the best looking. And the one on the bottom always needs a weight to make sure it hangs properly.

Chain to be

These (above) are the four I still have to mount - from Maxine, Janice, MaureenII and Chris.

Copying Dragonfly Wings

A few people have asked, so, - go for it - you are welcome to print hard copies of my instructions for your own private use, save the pictures to your computer, share them with friends (as long as you don't charge them), etc etc etc.

One of my reasons for posting them was so that people could use them. And my other was to have on record that they are mine (although I did put them up on my webpage about 12 months ago, I think, but have taken them off).

In stumpwork design in Australia I have heard that there is, in certain quarters, occasional disagreement about who has "ownership" of what technique. I don't wish to claim ownership of anything (but then, I don't make money from embroidery design - if I did it might be different).

But the one thing I would hate to see is someone else claiming my work - so I just thought I would put the whole process up here, so anyone can use it, and no-one else can claim it as theirs some time in the future, and then stop others using it.

So, go for it!

Friday 29 July 2005

Making Dragonfly Wings III

This is the final section for making a Dragonfly wing - I just need to multiply it by four, so the Dragonfly has enough wings to fly with.

For previous instructions, see Part I and Part II

The next step is for me to cut between each couching thread on the reverse, and either unpick or cut near the anchor point for the metallic threads. The reverse then looks like this:

wings7

Then, very gently, lift the wing off the fabric, like this - the metallic threads are still being pulled through the fabric - you can see how they are all at the same point.

wings8

This is how a single wing now looks:

wings9

There is a larger size HERE.

Next, I go to where I have already sewn a body in beads onto my work - remembering all insects are in three parts - head, thorax and abdomen. The wings always come off the thorax, so I make a hole beside it with a large needle, and poke the wires through.

Wings10

This is then the reverse of the work - I have shortened the wires and turned the ends on themselves. I then use the four ends of the metallic thread to stitch them down on the reverse, going only through the backing fabric. It is important to make sure some stitches are in the curve, to firmly anchor the wire. If there is not enough metallic thread I can use another thread to make sure they are firmly secured.

Wings11

I then have a one-winged dragonfly - so I repeat this process three times, sewing the second wing on the same side slightly below the first.

As long as I am gentle, I can then slightly manipulate them to the position I want.

And, when I finish this one, I need to do another set for my Country Garden Sampler - which is what I invented them for first. I just keep using each set on a new dragonfly, and never get to put them on that UFO.

Thursday 28 July 2005

A New Apron

Another apron jumped out of an Op Shop the other day, and into my collection.

Apron2a

This one interested me for a couple of reasons. The cross-stitch has had a hard life, and if it was ever even, it isn't now. But it does show the important interplay between the light, dark and intermediate blocks - such as the light lines between the diamonds:

Apron2

But the most important thing was the logic of a very deep hem. In the best apron I have found, it was completely lined with a light lawn in order to cover all the work on the back. This one simply takes a very deep hem, which is stitched down just above the cross-stitching. It gives weight and form to the apron, without making it too heavy, means you cannot see what some would think was an untidy back, and means threads carried from place to place at the back do not show up as much with light coming through from the back.

And it is very simple.

I was more than happy to pay fifty cents for this apron. I think I am refining my apron collecting to styles in gingham.

And I have bought some purple gingham. Stand by .......

Wednesday 27 July 2005

Hanging my Hearts

The time has come to start hanging the Hearts I have received as swaps on Chains of Hearts. I think I am going to hang them vertically, like this, down the joins between bookcases:

Chain4 Align Center

The top Heart in this group is by Maureen (the original and first, from Perth), and the bottom one is by Rosemary. And all cords you see were made on my new "Spinster". More about it at some future time.

And, I am frustrated as I don't have enough filling on hand for even one Heart, so these ones are no-where near finished yet, and look either flat or lumpy.

The back of this pair looks like this:

Chain4a

The top method was my first, experimental hanging system a while ago - I wanted a way to fill them from the back so that you couldn't see the join from the side. And this was the button structure I was trying.

The bottom one is what I have now settled on. I join two pieces of fabric, cut the backing from that, and sew on the three buttons. I then machine it all around, right sides together. Then I unpick just enough of the centre back to turn it so the right sides are out, and fill and (ultimately) stitch up the back opening.

The thing I like about the three-button system is that I can also twist a thread around the top two buttons like this:

Chain5a

And I can then display the Hearts on a long cord, like this beautiful one from Juliette (also waiting to be filled).

Chain5

Nearly there with this UFO - at least I know now how I am going to display them - like this, so I can change them around as needed.

Out with the spinster - I just want cords a little thinner.

Anlaby House Updated

Viv over at Anlaby House has updated her blog - her time working having finished for the minute. I was fortunate to see some of these earlier on - but they are so wonderful - especially her Gemstone ATC series.

Do have a look and keep scrolling down - really beautiful. I want to be like Viv when I grows up.

Deconstructing my Bracelet

The Bracelet I bought yesterday has been deconstructed, and I still cannot get over how much there is in it.

Bracelet2

This is it minus one bead - I put it on a metal skewer and applied a flame - as I suspected, it is a solid metal over plastic. If you want to have a peep closeup, there is a larger one HERE. And you can see, on the one third from the left on the top row, how the colouring can flake off - but it isn't a major problem.

Nothing, compared to getting 23 pieces of coloured shell, eight of them sequins, the rest various drops.

I feel like playing "Spotto" or having a scavenger hunt. These were in a booth in Forest Hill Chase in Melbourne. Anyone spotted them around anywhere else????

Making Dragonfly Wings II

Here is the rest of the first Dragonfly Wing. It is hard to know what to call this technique - the best description I have is "stumpwork meets needle-lace".

The first part was a bit difficult, as I need to have one long thread of metallic to do the blanket stitch right around the wire. When it finished I went through the fabric where the wires join and anchored it well away so I have leftover thread (there is a picture at the end)

Once I have blanket-stitched around the wire, I then repeat the process, with a new thread, but not quite as long. So I then blanket-stitch through the previous row of blanket stitch. And then go around again (still using the same thread) - and this is where this picture, below, is at - once around the wire, once around through the blanket stitch (bit looser) and I am halfway around again - quite loose.

wings3

When I have gone around two and a half times (so the thread is up at the round end), I add a very small bead.

wings4

Then I just run a line down the centre of the wing, drawing the two sides together, and finish with several blanket stitches to anchor it where the wires touch, and then go through the fabric and anchor well away from the wing - so I have excess thread for later.

Remember - it is important to go through the fabric only when starting and finishing each thread.

wings5

Below is what the back of the hoop then looks like for this wing. I have anchored the couching thread well away, although that wasn't totally necessary. But you can see where I started the metallic thread and then finished it well away from the point where it goes through the fabric. This is important for later.

wings6


I now need to make three more wings, and this may take a couple of days, before I attach them. So Part III will be back in a few days.

Yesterday's Find

Bracelet

This is what I found yesterday for $5 on a junk jewellery stand. There were heaps of other colours too, but I had to have the purple. And even two little dragonflies with purple stones.

Have I got my conversion right - $2.50 in the USA???

But the thing that stunned me is all the real shell pieces, with purple lacquer. They will be wonderful on the Peacock Wall Hanging. Plus all the metallic disks - not sure the beads are metallic though - think they are plastic.

And the Pearls - not a hope!

(I have got the dragonfly wing finished, but am still writing - back soon. Too busy pulling a bracelet apart.)

Monday 25 July 2005

Making Dragonfly Wings I

One of the things I need to do to finish my Dragonfly Wallhanging, is to make another set of Needlelace Dragonfly wings. I did have a set ready, but they were just what I needed to put on a block for Viv - so off they flew, looking like this:

Linda for Viv-dragonfly

These are wonderful when finished, but are not for the faint-hearted. I will blog their progress over the next few days.

This is where they are at the minute:

Wings1

I have drawn the four wings on calico, and on the top two I have already couched down fine wire. The ends of the wire are quite long, and taped to the hoop. I use a bright colour for the couching, so I can find it later to remove it easily. I start well away from the wire, and anchor the couching well away at the finish.

The wire I use is uncoated cake decorating wire, when I cannot get that I use coated wire and soak it in water to scrape the paper off. I like the fineness of that, and the metal showing through. (Never thought - wonder if it rusts???). Maybe beginners might try coated wire or fuse wire - it is a little thicker.

Once the wire is couched down, I take a dark green metallic thread (it is a YLI machine thread), and anchor it well away, and come up through the fabric at the point where the wires join. This is the only time the needle comes through the fabric until the end.

I wrap the thread around the two wires a couple of time and then head off doing blanket stitch closely around the wire, passing the needle eye first between the fabric and wire. The usual top of the stitch has to end up inside the ring, but you can twist it there later.

It then looks like this:


Wings2


More pictures in the next day or so.

Dragonfly UFO

I am going to give the Peacock UFO a little bit of a rest for a while, and finish off the Dragonfly UFO. Mainly because I don't have heaps more to do on it. This is how it looks at the minute:

Dragonfly Wall Hanging

The large version is HERE.

The Wall Hanging is made up from six DYB blocks (three across the top, three across the bottom), a central block from a Dragonfly RR, and two skinny blocks on the side to fill it out. With DYB blocks, I pieced them, and those across the top were embellished by Rhonda, Annette and Ann-Maree. Those across the bottom were by me, Julia and Jill.

Dragonfly RR block

The RR block has dragonflies by Bernadette (top left), Melody (the silver one to the right of Bernadette's), me (waste canvas, top right), Bear (the centre one with green beads), Catherine (the one to the right of Bear), and Janelle (centre bottom, with gold wings). The wings on the one at bottom left came from Maureen3, and there is an earring I found at bottom right.

There is a slightly larger version HERE. I just have a bit of seamwork to do, some wings to make, and a few dragonflies to attach. And then I add backing and edges, and it is finished. So I think it will be my focus for a little while.

Playing with Stamps

Stamps - machine

This is the rubber stamp I found at CraftAlive - I have been collecting sewing machine stuff for a future work. I like the thought of rubber stamps, but don't use them as much as I could - just stamped on fabric with a fabric ink - so they become machine washable.

In this case I have just stamped it on some hand-dyed calico - it would look even better on a finer-weave fabric such as a fine silk.

I was using OzeCraft dyes - and I think I could yet repaint the fabric around the stamp again for more colour - and then make it a central piece in a small work like a Heart.

This is another stamp I have - the Fairy with a Bubble from a 1920s illustration by Australian artist Ida Rentoull Outhwaite.

Stamps - Fairy

I can imagine this one with tiny silver highlights in the wings, and flowers and greenery embroidered around her, so she has to be "discovered".

Sunday 24 July 2005

Dawn's Vintage Embroidery

The other day Dawn posted photos of some vintage embroidery with elements of Chicken Scratch. She has now kindly posted close-ups of a couple of the elements - and they are just as I thought - needle-weaving and what I call spider-webs. Fascinating.

Sharon has had a look at them too, and sees them as elements of Tenerife Lace.

Me - I have turned my cupboards upside down, and cannot find that drawn-thread work I am looking for. There is no way I would have thrown it out. So where it is????

My DYB finished

The next little tick in a box has happened on my UFOs - I have finished my DYB for the Fan Wall Hanging.

This happens because in a special form of Round Robin I sent off six blocks I have pieced, five came back, each worked on by one person, and I had to do the sixth. Which I have just finished:

DYB by Linda

The large version is HERE. You can see the other five that this goes with HERE, and the whole concept (there are still three more blocks out in a round robin) HERE.

There are a couple of bits I am happy with here - I often use swirls of chain stitch to fill spaces, in this case around the Cloisonne (sp?) fan - as I don't like just plonking things in the middle of spaces without trying to tie them into the work somehow. This is a new version of swirls for me, and I like it.

And I must do lots more small, single rings of tatting like those at bottom left, for adding onto seams as desired. Usually I just do a few to use up thread on the shuttle when I finish something - but they are rather nice .......

Saturday 23 July 2005

CraftAlive

Just back form a quick visit to CraftAlive. Not a lot there, but a couple of nice highlights that did make the trip worthwhile. These are commercial craft fairs that tour the country, and a lot of the stuff doesn't interest me. But this year it was wonderful to meet Vicki from Lakes Entrance (who I heard about - waving to Joan). This quilt is Vicki's work, and the title is "Mixed Emotions"

Vicki1

You can see the larger version HERE. As you can see, she has used a number of techniques, and the colours are stunning. Even more so as Vicki was dressed to match.

Vicki has a shop and bed and breakfast in Lakes Entrance - and will even do small Retreats. Sounds like my idea of heaven. Imagine going to stay somewhere where you can even buy your threads on the spot while you stitch.

Vicki3


And it was good to catch up with Pam from Dancing Needles - she does the most wonderful punchneedle embroidery and publishes books on it, sells supplies, the lot.

PamGurney


I bought myself a "Spinster" from Pam, which is a bit like a small plastic drill with a hook on the end for making cords. I know I can do it with my cordless drill - but that is a bit impossible to leave in my sewing case - and this is faster than twisting a pencil.

And I even got myself a rubber stamp of a sewing machine. I can feel some fabric coming up. Or a machine in the centre of Heart - it is just the right size.

A Paper Chain of Hearts

Part I of my Chains of Hearts UFO is done - the "Paper Chain", which is the record I wanted to make of the Hearts that I have made and swapped out.

Each Heart, except for the last one (which is a colour photocopy), is a computer printout of similar size - and all a laminated. Then I have just sewn through them with crochet cotton at this stage.

Chain3

The whole Chain is quite long, and looks like this:

Chain1

Not that it is going to stay on the curtain - I think I will fold it up until I decide where it will go. Now I need to do Part II, which is back and mount the Hearts I have received.

Friday 22 July 2005

Is it Chicken Scratch???

Dawn over at Not All Those who Wander are Lost has posted a fascinating example of what may be Chicken Scratch on her blog.

This is another that has me confused - it has some elements of CS, but is missing others (eg the woven circles). But has other elements, such as large pieces that may be needle-weaving (or spider-web flowers) - even reminds me a little of drawn-thread work.

I am sure there are those out there who know heaps more than me about what the origins of some of the work are - but it is fascinating. And it came from a box of "old stuff" that was perhaps lucky to have survived.

Thank Heavens for Dawn. Do wander over and have a peep.

Arts blog at the ABC

Interesting timing - there has been a bit of discussion on Sharon's blog and on Musings of a Textile Itinerant about Arts funding for independent curators. And I have just noticed the ABC (Australian Broadcasting Corporation), has started an Arts/Entertainment blog called Articulate - and are asking for feedback.

Maybe it is up to the Arts practitioners to convince those in places such as this that the Textile field is one worth looking at?????

Chicken Scratch at Gina's

There is another Chicken Scratch discovery over at Gina's at Patra's Place - she has a 1996 book that calls it Swiss Embroidery now - we have seen it called Australian Cross Stitch in other places.

However what fascinates me is that there is a stitch in the examples shown in Gina's that is completely different to any of the stitches shown in the books/examples that Pam and I have come across so far. Click on the pictures for a better view.

The post is spread over three posts, so I have just given the general blog link - you need to look for all of the entries on Friday 22nd July (just in case you are reading this later).

Thanks Gina - the mystery continues to grow as to where/when it originated.

And, speaking of Chicken Scratch, here is an example of another piece from Margaret J (some of those who read here are in a Round Robin with her), who is in my class. This piece is her own design, and is unfinished. She is also into crossover, where she is using other techniques around it.

Chicken Scratch House

The large version is HERE.

Thursday 21 July 2005

Speaking of Fairies

Speaking of Fairies and Hearts - I was just looking back at this Heart (for Rosemary), based on the same Fairy - fascinating how, from the same starting point, something totally different happens.

Heart10

And, I probably should have also explained that Chains of Hearts is not just crazy-patchers - there are cross-stitchers, and redworkers and all sorts. All sorts of Needlewomen are welcome, and it is the chance to cross the boundaries that makes it so interesting.

This is the Heart I received from Juliette in return for the Fairy:

Juliette's Heart

Juliette's Heart finished

Chicory Fairy in conversation with a Butterfly aka Heart #14 is now finished, and is about to be on its way to Juliette.

Heart14fin


You can see the larger size HERE - big enough to see all the missed stitches! It is the Fourteenth I have made for swapping, but not the 14th I have swapped - #13 was for Juliette, and I have lost it somewhere. I was playing here with blue flowers - the blue poppy in the print, the blue of the chicory fairy and forget-me-nots.

These are one on one swaps on Chains of Hearts, a Yahoo group. We don't have deadlines - the idea is that you make a Heart, and display it, and then ask if someone would like to swap with you. A wonderful, easy, non-stress way to get friends and examples of their needlework. And the Hearts are just under six inches, so do not take a huge amount of work. I enjoy them, as I find them a wonderful way to try out ideas. One this one, I was playing with Forget-me-Nots in french knots that were one, two and three wraps of three strands of DMC.

They are swapped at this stage, unfinished, and the recipient gets to make from them what they wish. Mine are going to be made up into a chain of individual, stuffed Hearts that go around my bookcases.

Chains of Hearts is a lovely, friendly and welcoming group, and new members are always welcome.

I might post a few more of my older ones soon. In fact, here is one now: "Dragonflies Dancing". I think this one went to Maureen2.

Heart6

Wednesday 20 July 2005

Have a look at ......

Some wonderful embroidery from Brazil on Flickr and some incredible aprons on Pam's blog. You will have to scroll down a little, as there are some teatowels sneaking in there too - but the aprons are over three posts - the Chicken Scratch one is there too.

Tuesday 19 July 2005

A Heart in Progress

The Fairy Heart I am making for Juliette on Chains of Hearts is progressing.

Heart in Progress

It is now "A Chicory Fairy in conversation with a Butterfly". There are still a few things I am going to add, just deciding how.

And I have been contemplating a few things as I stitch - sewing time is good thinking time. There has been a lot of discussion on one of the lists I read about "cotton v. silk", usually DMC stranded as the cotton.

I am from the school of thought that, if it fits through the eye of a needle, I use it. If it doesn't, find something that does, and couch it down.

So I am no thread snob. I love cottons, and actually sew using a lot of crochet cotton - I have a lovely range I use for tatting - and I love flower threads. But I am also having another play with DMC stranded - I am getting quite interested in using combinations like two threads of one colour, and another of a third - some lovely effects come that way. Or two of DMC and one strand of metallic.

And I have been thinking about "style". I love watching blocks grow on Pam's blog, and admire the way she uses braids. In fact, I love them, and the way she embellishes them. But despite that, braids aren't my style - I love taking a thread and stitching all seams - so my finished style is quite different. And I don't use a lot of buttons - maybe if I did use more of them, and braid, I could be adding another dimension.

Not a lot of room to play in a six inch Heart though - it sure does make you clarify your thoughts.

Monday 18 July 2005

The Heart Progresses

My Heart for Juliette is progressing. We had visitors yesterday, so it was lovely to just sit there and do the needleweaving for the Chicory flower.

Heart14a

And, as luck would have it, I then went blog reading and found what had been posted on Smockery - I won't link direct to the picture, as there are two. If you are reading this in a few days, scroll down - you will know it when you come to it. :)

And Pam was asking about the blue poppy fabric - I did answer in the comments, but in case anyone is wondering - I think it is a Liberty fabric from either the 1970s or 1980s. It was a special one for my Mum, so I will check with her - she will remember exactly when she got it. I don't know why that surprises me - I do exactly the same.

Sunday 17 July 2005

Visual Journals

Gina from Patra's Place was asking about my Visual Journal. So here is an out of focus double page, with a larger one available HERE. That is still out of focus.

Visual Journal

I just use a hard-cover A4 lined book, and write down (not every day), what I am working on, what Round Robins I have seen, ideas, where I have been (you can see a business card in this spread), and whatever I want to keep track of. I use a lot of computer printouts of scans.

Some people do watercolour sketches, serious artwork, scrapbooking layouts etc. I guess each VJ is a different thing to each different person. For me it is primarily where I keep track of what I have done when, with pictures. And I have only been keeping it since October, but already I am stunned by how much I have worked on in that period.

I wish I had started this years earlier, as then I would have known how long I have been working on some things - often the first question I am asked.

Sharon, who we are all so glad to see back, has a sidebar category of Visual Journals, that aggregates all her blogging on the subject - a wonderful place to start.

Here is another page, which is the key for my Peacock Wall hanging, so I had an easy reference to what block came from where, and what to number it for scanning purposes etc.

Visual Journal2

Pity I changed the layout of them after that! And this one is out of focus too - so much for the quick happy snaps. But then, it mean I don't have to censor it.

Besides - bloglines seems to be down, and I cannot check for updates to read anything else. Drat.

Vintage Fabric on Flickr

For anyone familiar with Flickr (and those not yet familiar with Flickr), there is an interesting group on there that has just started called Vintage Fabric, where people are posting pictures of fabric up to and including the 1980s.

Not totally sure how you get into groups if you are not already a member, but try going to

http://www.flickr.com/groups/

I'm having a little trouble getting a pathway in, I know it is called Vintage Fabric, but sometimes it comes up as "no record". Just keep poking sticks at it until you get in there - you seem to have to be a member first.

Once you have a Flickr ID you can then subscribe and look at the pictures. Good fun - and there is a bit of discussion starting there too. Interesting to see discussion starting about common tags so people can group and search for photos - something that has been in the back of my mind for a while for CQ on Flickr.

Scary to think 1980s or 1970s might be vintage - I have soooo much of it.

A Couple of Coffees later .....

A couple of coffees later, and I am back. But not a lot to post this morning - no pictures yet of the Heart, as I have been catching up on one other thing - I have just updated two month's worth of my Visual Journal. One thing about blogs - it gives you a good record of what you did, when.

So now, my paper record is up to date. I really wish I had kept a better record years ago, as I have no idea now when I made some things, so it is harder to see how I have changed as time went on. And, looking back on my VJ, I definitely was writing down stitching ideas that I can revisit when I need inspiration.

But right now, I can see a half-hour window of opportunity to stitch, before visitors arrive. Bye.....

Ulla is blogging

Ulla is a Fibre craftswoman in Sweden (I think northern Sweden, up near the Arctic Circle), and she is blogging. Her blog is called Ullas Fiber blog. And Ulla is writing in English, which I really appreciate, as my Swedish is non-existent. Ulla has been around for ever on Chains of Hearts, and seems to have been blogging for a while, but I have only just found out.

I'll be gone for a while - I am going to go and get a lovely, strong cup of coffee, and read, and read and read.

Saturday 16 July 2005

Heart for Juliette

Now that I have finished my work in all Round Robins, I am off seriously on my UFOs and other half-finished commitments. And the first of them is a Heart for Juliette, on the Chains of Hearts list at Yahoo.

I have owed one to Juliette for ages, and she has been most patient while life has taken over around me, and I then lost the half-finished Heart. (Hearts are wonderful - they are so small you can take them anywhere to work on them. Trouble is - it also means they are easy to "file" with something else in an out-of-control stash!). However..... I have now given up, and tried to repiece the Heart as much as possible to the one I was making. Took forever to find the Chicory Fairy fabric again, but I did. (Know I promised a fairy to someone else, when I found this fabric. I think it was Janet, so I will ask her, but if it was someone else, feel free to drop me a line).

So now I have the basic, pieced Heart. Almost. It looks like this:

Heart for Juliette

So now I will move my window template (fancy name for a bit of cardboard with a Heart cut out of it), until it tell me exactly how it wants to be.

Then I embellish it, and send it off halfway around the world to Juliette, in England, for her to put on the backing, or mount it however she wishes.

So the Fan Block will have a rest for a little while, while I finish this one off.

Then it is Fan Block, Peacock Wall Hanging, Dragonfly Wall Hanging - and that is as far ahead as I am going to look at the minute. Except there are a couple of other pieced Hearts waiting to be embellished in my folder. But I am not agreeing to swap any more until I know I have one ready to send back.

Friday 15 July 2005

Progress on my Fan Block

Progress on my Fan Block is slow - this is where it is up to now:

Fan block progress

The cross-stitch, worked with waste canvas, is a Semco Mini, and was supposed to be blue bells - but I love Lily of the Valley.

Now, if there are any of my DYB group watching, they will be gnashing their teeth - I have removed lace from this block to make the cross-stitch show up, and used white - when I asked them not to. Oh Dear. :(

And this picture has now rotated from the last one - it now has a top and a bottom. Sort of - the Lily of the Valley would look odd to me any other way, but I suppose it is possible - Victorian CQ was often made to be viewed from any side.

Thursday 14 July 2005

Laurel's Work in Memory of her Mother

Some time ago I posted a picture of this work, before it was finished. Laurel made this cover for her overlocker, in memory of her mother, featuring many of her sewing items.

Laurel's cover

The cover goes over a domed, wooden cover, which is itself a work of art, made by her partner.

The wooden cotton reels, buckles, buttons, tape measure etc were all her mother's, and Laurel has made a central machine-embroidered motif, and used machine embroidery in other innovative ways as well. And, Yes, that is a zipper top right.

I reckon this is the perfect example of how the new embroidery machines have a place in Crazypatch - and this is one of the most wonderful pieces of work.

So we are really going to miss Laurel, who has now gone off to learn computers. But I don't think there was anything left that I could teach her anyway.

Thank You, Laurel, for everything, and for letting me post the picture here. There is a lightly larger one HERE, but I really wish my camera had done it better justice.

Wednesday 13 July 2005

Starting on my Fan Bock

I am really enjoying how Pam is posting her blocks as she works on them, so am blogging the progress of the next block that I am working on. It is for my fan wall-hanging, which currently looks something like this:

Fans nine

This is it, before I started. It is the sixth block, above:

My Fan Block

It was also the final block in a DYB - you can see closeups of the other five HERE.

My Fan Block started


So far I have added the tatting (the blue was too sombre), and worked on emphasising the vanes of the fan by doing a different stitch combination along each. I also used the block to demonstrate a beaded seam, so I now have great difficulty on getting a hoop onto it. Silly me.

Speaking of Pam, she is considering "When is a Block Finished?" For me, it is finished when I absolutely have to make up a UFO or meet a deadline. They never finish voluntarily for me.

Crocheting Monsters

Oh Dear, thanks to Yarnstorm, I have just lost half an hour in Crocheting Monsters with Lady Linoleum.

And, I did so enjoy it! :)

Tuesday 12 July 2005

Janelle's Fan Block Finished

Janelle's beautiful block in the Fan RR is finished, and is about to start on its way home to New Zealand.

This has been a wonderful block, and everyone has been inspired in what they have added. But they also worked in a suitably restrained way - which is what makes this block so special.

Janelle's Finished Fan

The larger version is HERE.

My additions are the waste canvas flowers at the top, the tatting along the curved line and the three largeish flowers (two needle-weaving, one in beads) on the lower curve. I was going to put a ribbon flower on that diamond shape lower down, but the centre of beads looked perfect on its own.