Saturday 26 February 2005

Oooooooooooooooh!

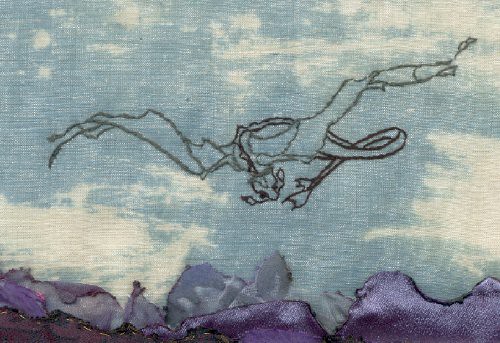
Looking a bit further on one of those sites - I haven't seen some of THESE before - especially the Dragonfly Wings - scroll down.

Temptation!!!

I have been tempted.

Bead Soup1

This is the Bead Soup Starter kit that I have picked up. And I thought very carefully, as $9.90 is a lot to pay for a container of beads. But they are all glass, unlike the Judith and Kathryns, which seem to have a fair lot of plastic in them. I do enjoy glass beads. There is also a Bead Soup Mix (ie more of them) around $16 - I resisted. Apparently they have a "Bead Gravy" too, but I haven't seen that yet.

The blue lot look lovely for Underwater/Seaside stuff.

This is the contents, a little more spread out, to give some idea of the volume:

Bead Soup2

These are Hofmann originals from California, and you can see some charts HERE. Although I did get mine locally.

And, speaking of temptations - I have just seen an example of Colourstreams hand-dyed velvet. The squares are not large, and I didn't dare ask the price. But the are dyed to match the threads, and I am glad all I saw was an example, or I would have had to have some. And looking at Robyn's website, I see she also does them in silk. I think I am going to be in very, serious trouble.

Bras on Display

Eight of our Bras from the Retreat in Can-Bra last October are on display in Sale this weekend, as part of a cancer fund-raiser.

Bra Exhibition

I didn't get to do the display work, and walked in to find them set up like this. I have to say I sympathise with the exhibition organisers - they borrowed the torsos, and couldn't work out what to do - they didn't want to put undies on the torsos (they didn't know what to use, and didn't wnat to detract from the Bras), and then weren't sure where to put the tags.

So this is the final solution - and they sure are attracting attention.

Bra Exhibition

Here is the view for the other side - as you cannot appreciate Linda E's bra in the other photo. And this one shows the Homespun open at the article about the bras. The photos don't really show the eighth bra (The Odd Cupple) all that well either, as it is flat on the table. And from the photos it is a bit hard to appreciate Jodie's, which is black on black.

You will be glad to see M3's pointy one is well out of the way - it is downright dangerous!!!!

Anyone unfamiliar with these Bras can see the whole lot HERE on Sharon b's pages.

Tuesday 22 February 2005

Simple tatted edge

Tatted edge

This is the simple tatted edge I saw in Needlework and associated collectables yesterday. This one is simply rings of ten double stitches, not pulled fully closed. Practice may make it a little more even.

Now others may know it - but I didn't, and I think it is beautifully simple as a scalloped edge. And a good way to used up the leftover thread on the shuttle.

It doesn't like being straight as much as it likes being curved - so here it is, wrapped around a button. Not that I have sewn it down yet, so there are ends everywhere.

Tatting

Monday 21 February 2005

Book Review

It must be the season for lovely books. I see Sharon has the Quilt Savvy book on her website - I have been trying to decide if I would get it sight unseen, so I am so glad Sharon has given it the "seal of approval".

I have just found this book in a local bookshop - in amongst all the ones about collecting hand tools, and cigarette tins, and all that sort of thing.

Collectable book1

It apparently came out in 2004, but I hadn't noticed it around. Ken Arnold produces a whole series of collecting books, self-publishing as Crown Castleton Publishers, P.O. Box 235, Golden Square, Vic. 3555. Phone/fax 03-5441 8070. Golden Square is a suburb of Bendigo, a large rural city in central Victoria. He also appears to operate a shop at 359 High St, Bendigo, open "when convenient or by appointment".

Although Ken Arnold appears as the author, biographies appear for two other people. Jan Harris is a member of the Needlework Tool Collectors Society, the Victorian Button Club and the Castlemaine Branch of the Embroiderer's Guild. Jean Taylor is a button collector who also trades in "interesting old clothes ... lace and sewing items".

The book (which I paid $35 for), is mainly black and white photos on quality glossy paper, and paperback. There are 144 pages, A4 in size. And there is a heap packed into them, Arnold's having "concentrated on mostly Australian content", although many items originated overseas.

The book proceeds through sewing machines, sewing boxes, needle cases and pin cushions and thimbles. It is a mix of photographs of items and reproductions of advertisements. Such as this one below:

Collectable book2

Many of the advertisements appear to have been reset in modern type, which detracts a tiny bit for me, although I suppose is not a major consideration. It then continues on through buttons, embroidery (including a number of old stitch diagrams), threads, crochet and tatting.

Now, before anyone gets toooo excited. There are no patterns or instructions, and no modern prices. This is a miscellany of "things". And it is lovely as that.

On we go, through netting (a small section, but not something you often see around), macrame, jewel work, beadwork, applique (more interesting stitch diagrams), samplers (disappointingly not a lot), smocking, knotting and lace-making. Many of these sections are page after page of small photographs of examples.

I don't think I could have lived without this book! I am now going to go and make myself a good cup of coffee and look at it slowly. The tatting pictures are so good I should be able to do them without a problem - there is one very interesting one for someone who is just learning and starting on chains. Call back soon.......

I don't know how you can easily obtain this book - I don't think it is distributed to many bookshops, I think Ken Arnold mainly sells through collectors. You could try ringing the above number - he may be able to mail on credit card details (it weights 600 gm, so will be a little bit pricey over great distances). ISBN is 1-8753-4244-3 so bookshops that are good at ordering may be able to pick it up for you on the name of the publishers, Crown Castleton Publishers, and the ISBN.

Now, what am I going to do first? Try that tatted edge or read the whole book again? I know - make the coffee!

Sunday 20 February 2005

THE Dragon

Maureen's Dragon


This is the dragon I am going to work on Chris's Dragon Block. In this case it was one thread of DMC for Maureen, for Chris it is going to be in gold, on black, I hope. Well, I know it is on black, I am just hoping the gold will work. It was copied from a Jillian Sawyer stained glass book, by tracing onto tissue paper, and then I embroidered over the tissue paper. In the one for Chris I will be crossing a few seams, so cross a few fingers for me.

I love Jillian's work, and you can read more about her HERE

UFOs - what is next????

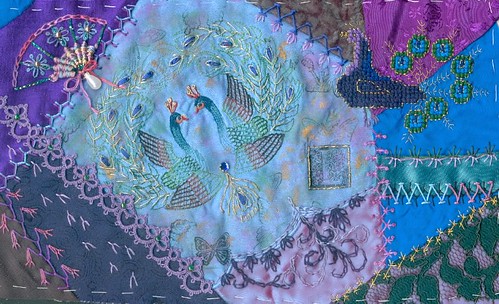
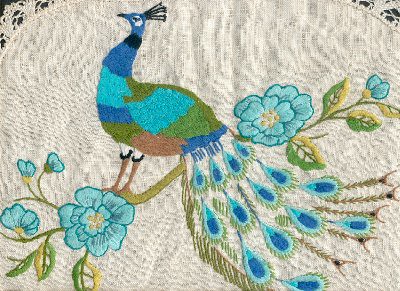
Okay, so the Naked Block is finished in the Peacock Wallhanging. So what is next??? I really am working on a Dragon for Chris in the Dragon RR. I really am. So I am just thinking about this one, aren't I?

Peacock Blocks.
Coincidentally, this pair is made up of a DYB from Chris, on the left, and a filler piece on the right where I was demonstrating Coral stitch for bare branches, and trying out this Peacock. Everyone keeps missing the tail in it and thinking it is a kangaroo. :(

But since Chris did such a lovely DYB for me (the watch is one we found together, and we decided to have a play with them in CQ) I had best go and do the Dragon.

But if you would like to have a look at the block closeup, it is HERE. Because that butterfly Chris did is really worth a fair examination.

And I need to embellish the seam between the two blocks, and do something to integrate those tatted flowers on the right-hand block. And fill it in a bit more in general.

Saturday 19 February 2005

Bras being exhibited

Jenny Bee flyer


I am starting to turn my mind to an exhibition next weekend where some of our Bras from the Canberra Retreat will be exhibited.

Now, it might sound silly just putting photos of posters up here - but it is the easiest way to send it out to those who are lending Bras. You can download the larger size poster, print it out, and paste it in your Visual Journal. How's that for efficiency!

If there is anyone who missed the original request for a loan of their Bras who would now like to have them included, they will need to be in the mail to me by Tuesday at the latest - but please e-mail me and let me know they are coming, so space can be made for them and I can print labels. They will be returned by registered post.

Anne's DYB

For the next month (or at least, until the 15th March), I have Anne's DYBs with me, to work on one of them. This is the one I have chosen:

Anne's DYB


DYBS (Doing Your Block) are a special Round Robin where each person in them works only on one block. So what you get back are the individual expressions of how each person would approach a block.

This is the second time that Anne has been in a DYB with these colours. You can see a few from her first DYB on Peggy's Forum. (You need to sign in first, then choose the Doing Your Block forum, or else you will not see the pictures). There is a link to them in the recent post in that Forum that shows the brilliant work by Catherine, who is before me in this DYB.

Anne is asking for very muted colours, as she has a number of photographs printed on fabric that are going to be mixed in with the blocks, and she does not want them overwhelmed. I think I know what I am going to do with this one already. Just I am not sure there is enough room for what I want to do.

Naked block finished

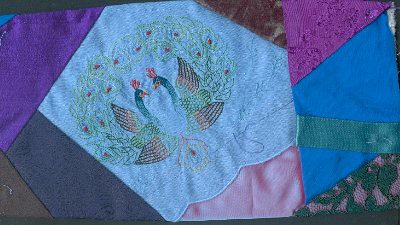
Remember this one??? The Naked Block I was working on as a major part of my designated UFO, the Peacock Wallhanging?

Naked block
It is based around a section from a pillow-slip that Rosie sent to me, that I then dyed with Dylon dye. Then, my challenge was to get it a little less"bright", so it would tone in more.

So, here it is:

Peacock Blocks3

And you can see an even larger copy HERE

Basically, what I did was variously dab it with ink from fabric stamp-pads, and then stamp it with sections of rose and butterfly stamps. And included a "L" block stamp as a signature. Part of a rose is just above that butterfly in the bottom, and that is the scrawny old peacock looking in from the left.

Then I dabbed it all over with purple and gold folk art paints. And embellished. I was put off for a while by the red in the peacock tail feathers - but then I just embroidered over them with dark blue. Then I used a thick gold thread to fly-stitch their feathers. Wish I knew what it is, but it is just "found in my stash". It is a stunning thread, but I have a nasty feeling it is from a 1970s kit I did, in the, ummmmm, 1970s.

So now, all-in-all, I am quite happy with this block. I need to look at the whole UFO and work out what I am doing next, but I think it is mainly to join more blocks and embellish those seams. This UFO is now getting quite achievable.

Friday 18 February 2005

Fan #2

Knew there was another type of fan I used to do. Here it is:

Fan2

I first saw this one on a round robin from Rina, and that one used a much finer lace (which did look very lovely). I think the trick for this one is to do the spokes, then the lace, then the rest. But who knows? Thiso ne is from a DYB block that I did for Chris. Just looking (and off picture), there are a heap of other interesting things I did on this block I should revisit. Must look at my old work more often - the is one on here that will fill a little space I need to fill on the Naked Block

Thursday 17 February 2005

Fan #1

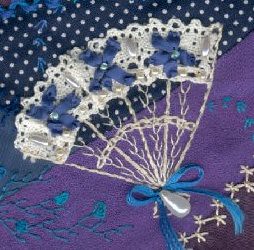
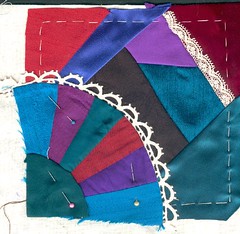
Viv has crafted some beautiful fans on my DYB block, and I have been inspired. So this is my first attempt to use her idea of spider-web fans (at least, I think that is what she did)

Fan1

Firstly, I knew this one would be wonky, because of where I had to fit it. I drew around a glass, then added spokes. Then I used Colourstreams "Exotic Lights" to weave in the bottom of the spokes. I chain-stitched around the top (the line from the glass was still marked with tailor's chalk). Then I did some daisies (with pearl centres) and tied a bow with a pearl drop at the bottom. Wasn't I lucky I had the right number of spokes - one more or one less, and I would have been in trouble!

Had I had more room above I could have put something above the chain stitch (bead loops spring to mind), but there won't be room as I am at the edge of the block.

And yes - this is the Naked Block getting a bit of a run again. It is almost finished.

Margaret's Needlebook

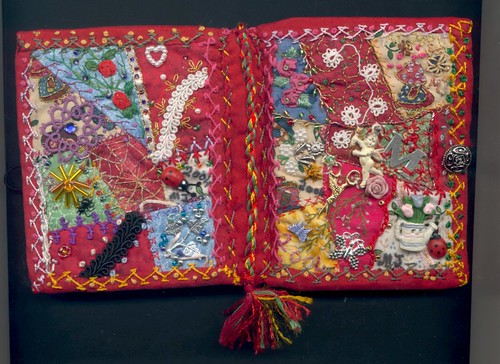
Today was my CQ class, and I have borrowed Margaret's needlebook to scan.

Margaret's needlebook

This was a class Round Robin piece, and had some red in it. But is was made brilliant by Margaret's cheerful treatment - she gave it a red edge and then stitched large, bright seams around it. The twisted cord down the spine is firmly sewn on.

If you would like to look at a closeup scan, it is HERE. I think you will find an icon there to click to see it really large. Opened out, the needlebook is 19cm x 12 cm - it is amazing the embellishment that has been fitted onto it.

Tuesday 15 February 2005

Beautiful Herb graphics

Still wish I was in the Herb Garden Round Robin that is happening at the minute - so just you ladies all make sure you post heaps of pictures to keep me happy. :)

Thanks to meggiecat, I have just found a link to these pictures - which I cannot correctly acknowledge, as the site is in German, so I am not totally sure who is what. But the pictures are in English! :) All Herb Gardeners could well have a look.

They are the work of Franz Eugen Köhler 1883-1914 (which seems to be a sadly short life). Some would make wonderful silk prints.

Monday 14 February 2005

Fan Block 2/3 ready

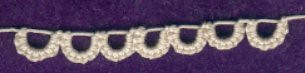
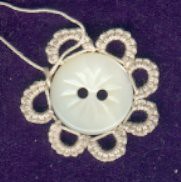
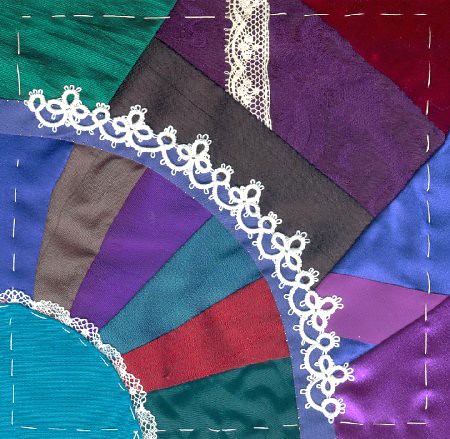
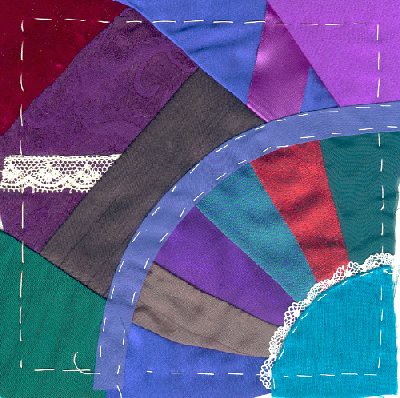
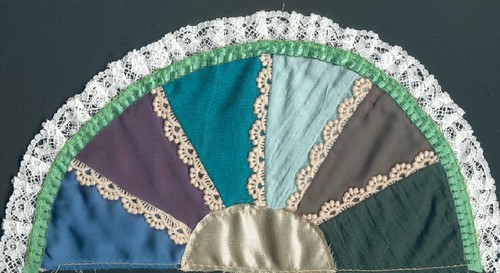
The second of my three fan blocks in the Round Robin (for mailing 1/3) is ready. This is the one with the cotton bias around the fan. I stitched the bias down with small stitches in gold metallics - if you have got a fault, you make a feature of it - and put the tatting on top.


Fan Piecing6


Now it is ready, and I better get moving and get the third of three ready. The colours in some fabrics are really off on my screen - the second one of the fan segments is brown on my computer - it really is emerald green!

Sunday 13 February 2005

Phillumeny

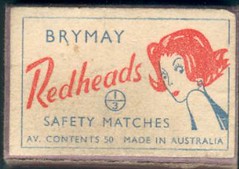
Phillumeny is the organised collecting of Matchbox Labels. Well, there you go!

The website for Organised Phillumeny in Australia even tells me there is going to be a national exhibition in Sydney in April 2005. Wish I was there!

Then, there is a website for Matchbox Redheads of Australia. I love it! Just wish some of the pictures were a little larger for me to borrow. Because that one that first arrived in 1946, and was on boxes to 1958 is the one I want. The one I spotted in DH's tin was from 1958 to c.1971.

But there are some other fun ones on there too. Almost enough to make me want to be a phillumenist - I was one as a kid, when they brought out all the different labels and you tried to collect them all - the late 1950s and early 1960s, I think.

So, maybe I have already been a phillumenist. Might have to go to Sydney in April. :)

You Know You've got it Bad When ....

You know you have got it bad when .......

DH asks you to hold something while he solders, and you spot a matchbox in his work-box. And you think "I'm sure they don't look like that now".

Redheads matches

I'm a redhead, so I have always watched these boxes. So it was off to the scanner. But what I realllllly want is the box just before this one. With the 1950s hairstyle with the rounded curls.

But, even if I cannot find it, this may well end up on a silk print anyways.

Wonder what else is out in his shed.

Marketing

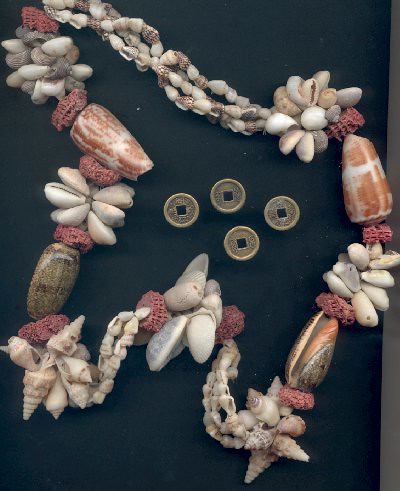
I've been off to the market - haven't been to this one for about a year. It is not the sort of bright, breezy one some towns have once a month (or once a quarter), but one full of semi-permanent stalls that happens every weekend, with a mix of others where people come once-only to clean out their junk. Some parts of it are, well, a bit seedy.

But this time I have been in luck. First it was the seashell necklace - at $2.

Marketing

This one had to come with me to be deconstructed. There are shells in it I haven't got in excess, for underwater scenes. But tehre are others that I have a lot of. So I think I might be forced to make up some baggies for Baggie Bank.

The Kauri shells in it are not as good as others I have found - they are quite faded. So what I am hoping is that this means they were harvested as "vacated" shells washed up on the beach, and not by diving. Which would hopefully mean that the coral (which I haven't found like this before in a necklace) would also have been washed up on the beach. I would really have trouble enjoying coral if I thought it had actually been broken off a reef.

Then, I found the small Chinese money (in the centre, above) that I have been keeping an eye out for. It is easy to get the larger stuff around, but I like these more delicate ones. At 50 cents each. Very nice. There was some genuine old large Chinese money there at $2 each, which I resisted with difficulty.

I want to experiment with bead/button trails, but with more than just beads and buttons in them. These are ideal for what I have in mind.

But it was just as well I didn't spend up, as this is what I found next:

Peacock4LR


This doiley was only $2!!! I immediately ignored that I didn't like the body, I didn't like the colours in general and it was too big! It had to come with me. I have no idea how I can incorporate it in my wall-hanging (horror of horrors - could I cut it into pieces to avoid that body?). Maybe I could lightly dye it and then paint the body? One thing is for sure - it is not going to be as easy to work with as the one Peggy gave me.

But I couldn't leave it there, could I???? Really??? And I only spent $6 for the whole lot. :)

Saturday 12 February 2005

Suffragette Block Finished

The Suffragette block is finished - or as finished as it is going to be.


Suffragette Block

The scan above is of most of the block, you can see a very close-up view here.

The whole block can be seen here.

With this block I chose to work in the purple, green and white of the Suffragettes, and wanted to make it almost monochrome - not quite the right word, but close. I chose solid fabrics and to work with only DMC threads (in an attempt to force myself to do more detailed seams to make up for a lack of colour). I was actually working with white, one green and three purples.

I was also experimenting a little with adding curves by appliquing pieces down on top of flip-and-sew

Purple, green and white were the Suffragette's colours meaning Give (Green) Women (White) Votes (Violet).

The block is for a set of Community Quilts - the Quilts of Understanding, and the written material I will submit with it will examine several areas - the role of women in society, political power for women, and "making do" (ie re-use in crazy quilting). It sounds more stuffy than it will be.

This block was not a UFO - it was a commitment (ie it has a deadline), and I am glad to get it done. I can go off now and work on a UFO (ie something that always gets left behind, as it has no deadline). If it had been a UFO I would have kept working on it for much longer - I could see seams crossing blocks almost like blackwork - but it isn't going to be.

But I still like the "monochrome" treatment, and would like to work with it again in the future.

The Blank Page

I am enjoying reading some of the blogs that are around - and The Blank Page is one I have known about for a little while - but now Sharon has "outed" it, I am sure there will be others slipping over there as well. Welcome Sharlee.

I have to admit I don't spend as much time agonising over my work as I should - I tend to quickly throw something together, especially at the piecing stage, and agonise more at the embellishing stage (if I agonise at all). Probably what I hanker after is more time to be able to agonise, and think carefully about what I am doing when I piece - but I am always piecing to deadlines. :(

And there is always the maxim that I comfort myself with as I throw things together - "If you have a fault, make a feature of it". I first heard this one as a friend was redecorating a toilet with a cast-iron chain pull cistern in it. She painted that purple and put loud wallpaper behind it. And it looked stunning.

Some of my best CQ work has been at the embellishing stage, when I have taken a fault and worked on it you make it a feature.

Trust me. :)

Maybe I would do a little better if I agonised a little more.

I shall enjoy The Blank Page, it inspires me, and I hanker more for the time to think more about what I am doing.

Friday 11 February 2005

It's Auld Lang Syne

It's Auld Lang Syne - if that is how it's spelled.

What is???

This music on the old quilt on my jigsaw. Thanks heaps to Jerry (of Sharon and Jerry) for working it out. And I just had to put a note on here, just for people who don't scroll down and chase through comments.

I wonder if there are any other things hidden there, quilt???

Anyone putting music in quilts these days???

Not a lot of CQ happening here - maybe a little tatting for fan blocks, but that is about it.

Thursday 10 February 2005

Fan Piecing

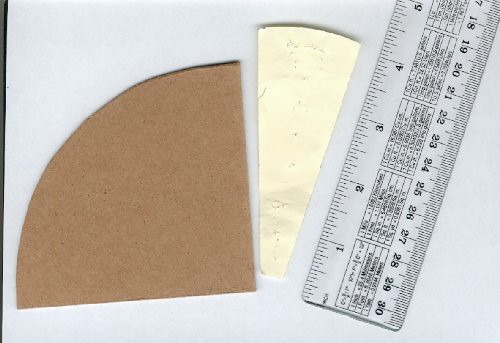
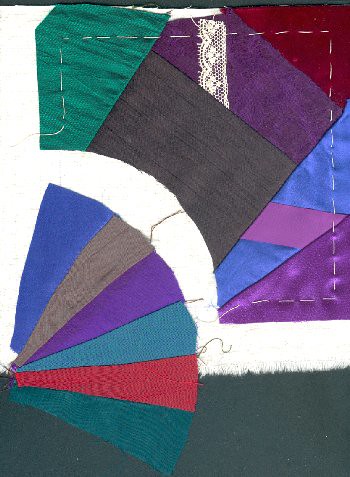
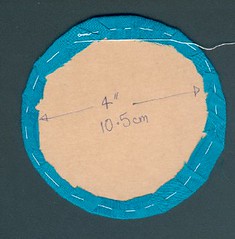
My class and I have been experimenting with fan piecing before a Fan Round Robin starts soon. This is how I am currently doing six inch blocks, although there are others ways.

Firstly, I would cut an 8" foundation block, and draw the six inch square front and back. (I didn't this time, I pieced them like this - I wouldn't do it again).

Step 1 - make a template for the whole fan, and for the segments. I did mine by trial and error, and note the segments are slightly longer than the fan. The fan is light cardboard, the segment paper.

Fan Piecing2

Step 2 - piece the centre and three corners of a block, use the cardboard template to mark where the fan will go, and trim back. Turn over to the back and use the line drawn there to tack around the six-inch line, which will be your seamline.

Step 3 - cut six (in this case) segments and join them as a fan off foundation. (I actually cut them out two at a time, by pinning the paper on - double thickness, it cuts better. I then have a heap of segments to mix and match). You can sew lace into the segments as you go, but it needs to be fairly fine - like this.

Neaten up around top of fan if needed. You are then to this point:

Fan Piecing1

Step 4 - place fan on block, with point of fan just inside seam line, if you are putting a patch at the point; move lower and leave a seam allowance if you are not. Pin down, turn over and tack along seam line on back to hold fan.

Step 5 - go into your kitchen and find a pleasing circle - this one is a ramikin four inches in diameter. Cut a circle of light cardboard and then a circle of fabric one centimetre wider than your circle all round. Tack around the outside of the fabric and gather so the cardboard is in the pouch in the middle. Press from both sides, and you are to this stage:

Fan Piecing3

Step 6 - remove cardboard from the circle, press again (just to be sure). Cut circle in half, then in half again. Reserve one quarter and the half for future use (who knows when you will make a half circle fan, like this, rather than a quarter circle one. Take one quarter and tack it down in the point of the fan - adding some lace if you wish. For tacking the point/corner, turn over and follow the six-inch line drawn on the back.

Step 7 (which can be done before step 6 - no drama). Cut the right length of cotton bias tape and tack down around the raw edge - adding lace under the bias at the top edge if you wish.

Lace Note: some lace needs to be lightly gathered for fans - especially if there is a straight line rather than a "toothed" finish on one side - if you know what I mean. I find some coarser laces need less gathering - see below.

Fan Piecing5

And that's it - your block is ready to send off. Those in the round robin will know very obvious tacking like this is designed to be removed, but do include that note in your RR book. And make sure you use nice, contrasty thread, so it is easy to see and remove.

One of those fan seams (on the left) is a bit wonky - but I am sure someone will sew something over it in the RR. Looks like a good place for a spray of flowers!

Variation:

Follow steps 1 to 3

Before you place the fan on the block, cut a length of lace (lightly gathering if necessary) and place it around the top of the fan right sides together - just like flip-and-sew. Machine lace to fan. Open out and press, so the raw edges are turned under the fan.

Tack fan to the block and follow instructions above for adding the quarter circle in point if desired, it then looks like this:

Fan Piecing4

The lace in this case was a very coarse one that did not need gathering, and eased well around the curve.

In fact, I reckon anyone can make a heap of these small fans, with or without the lace, and have them handy to just add to blocks as you go - either by appliquing on top or by piecing into seams.

Once upon a time I used to make the fans by flipping and sewing direct onto the foundation, but had trouble dealing with the raw edge and adding lace in the variation above. But you can piece direct onto the foundation if you are using the bias to cover the raw edge. It just takes a bit of trial and error to work out where to put the bits.

So I like this one.

One solved, one more

Sharon over at in a minute ago has solved the puzzle of the origin of the quote I posted yesterday - it is by James Truslow Adams.

Jigsaw quilt music

Here is the next question - is there any significance to this bar of music??? One person who has looked at it says that it is not "real" music (nor does it spell anything). But you never know.....

Wednesday 9 February 2005

Welcome

Welcome to the new blogger on the block!!!!

Vivienne's anlaby house will not doubt be a zippy and fun place to get across a number of crafts - knowing Viv's background. And she sure is a fast learner - she is writing in HTML already - and this morning she didn't even know how to spell it (computer joke by my resident programmer!)

Welcome Viv, long may anlaby house prosper

What is written on the Quilt????

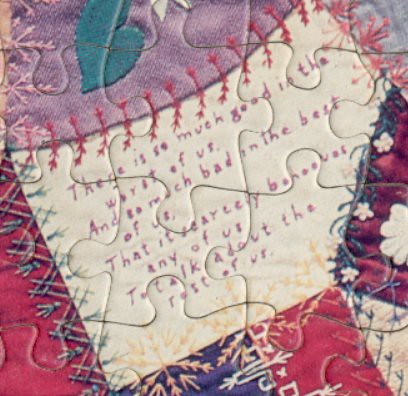
One eagle-eyed reader has asked what is written on the block to the right of the date on the old jigsaw quilt.

Verse - jigsaw quilt

It reads:

There is so much good in the worst of us.
And so much bad in the best of us.
That is scarcely behooves any of us
To talk about the rest of us


From what I can see (and remember I am working with a print), it appears to have been hand-embroidered .


Piecing Fans

I've just been off looking at piecing fan blocks - and revisted this piece from
verrrry early in my CQ time.

Fan block

The interesting thing about this one is the lace insertion as I was piecing - I am working with six inch blocks atthe minute, so it is probably a bit fiddly. And I have different methods for the small half-circle in the centre.

But I may yet find a piece where I can just applique it on top.

Stand by - within the next 24 hours I may have taken the plunge with some detailed pics. :)

Tuesday 8 February 2005

Last Jigsaw Quilt pictures

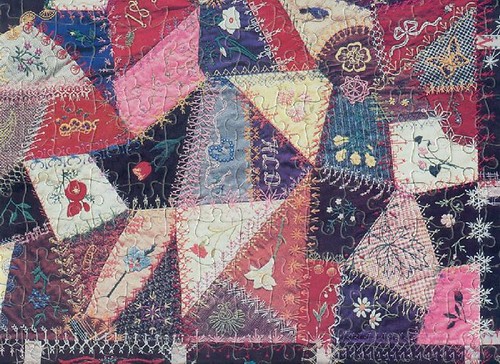
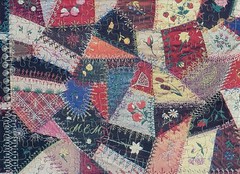
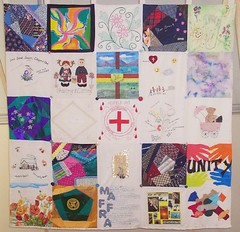
These are the final quilt pictures I will be posting from my jigsaw quilt. This is the whole quilt:

Full jigsaw quilt

I think and hope this link will take you to the closeup at flickr

Once you are there, use the cursor (which shows as a magnifying glass with a plus sign on it) to increase the size even further.


Closeup of one section

Closeup from jigsaw quilt

There - I guess I had better go and do some stitching now, so I have something to post tomorrow.

Change in settings

Hi Everyone,

Sorry to all those who have just got used to my settings - but I thought this might happen and it has. It seems once the blog address is out there for a while it gets harvested, and thus becomes vulnerable to spam, which appears in the comments.

So I have changed the settings so that only those who are registered can comment, and I will see if that stops it (*fingers crossed*). I hate doing this, and do appreciate your comments, but non-one wants to read through a long list of spam or "this post has been removed" in the comments.


Monday 7 February 2005

Jigsaw #4 - bottom right

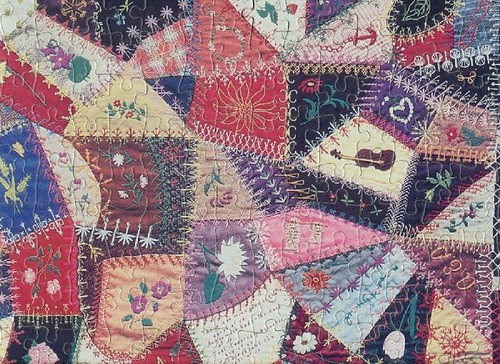
Here's the last corner - now to pick out which bits to do as a close-up, as I cannot do them all. This one has the initials H.L.D. on it.

Jigsaw-bottom-right


Jigsaw #3

Here's another piece of the jigsaw - just so I can avoid the issue of having nothing else from me *grin* This is the top, righthand corner.

Jigsaw-top-right


The initials in it are A.E.D., but are upside down to the viewer.
From the edging, which goes around three of the four sides, I think there is probably more of the original quilt above than fitted on the jigsaw.

I'm, starting to find a few seams the same now - the one with the fans is in the bottom left as well as the top right. But they sure are complex seams.

When I copied this I seem to have missed out the edgings, which are rectangular black pieces, also embroidered. Must take it off the wall and take a good picture of the whole thing.

Sunday 6 February 2005

Stitch Combination #3

Stitch combination 3


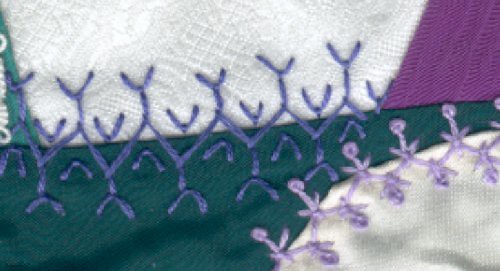
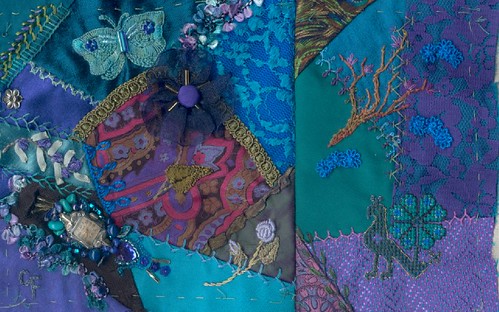
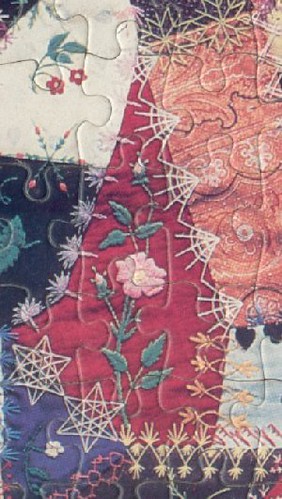
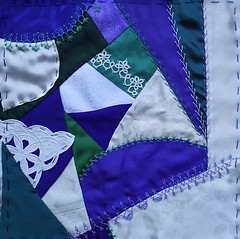
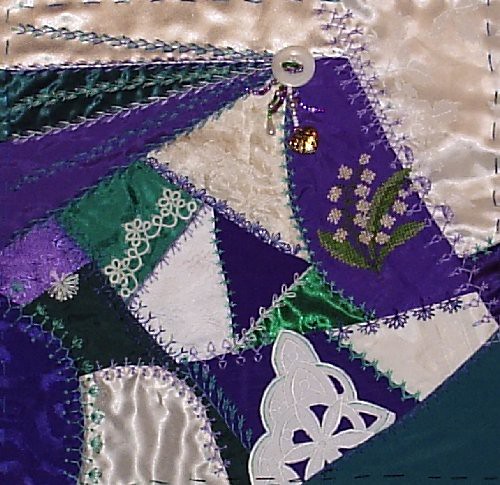
This (in the darker purple) is the stitch combination from the bottom left of the jigsaw. First it was a line of Cretan stitch, then Fly stitch on the arms and in the middle. I found it easier to go up one side and down the other, as I am restricting myself in colours for this block. But it may worth trying the Fly stitch on the arms in the same colour as the Cretan, and the one in the middle section in a different colour - so you would then work it a different way.

But I do like it.

Old Quilt Jigsaw II

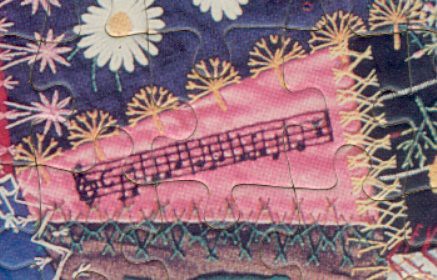
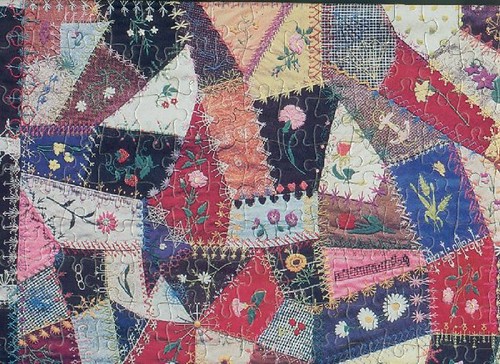
Here is today's section from the old quilt jigsaw I have. Once I have posted all four corners, if enough people are interested I will try taking it off the wall and putting it on the scanner for close-ups. If anyone is interested - I MIGHT be able to be talked into closeups of particular spots.


Jigsaw-top-left


Lily of the Valley


Lily of the Valley
Originally uploaded by LindaB.
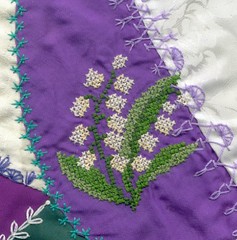
The Lily of the Valley is finished on my Suffragette Block. This was originally a Bluebell, and I used part of it on my Tsunami Block. I used 14-count waste canvas for this one - I prefer it to the 12-count, as it makes a smaller design, I only use two threads instead of three and the needle goes through the fabric easier.

The only chance I would have made to this is to move it slightly to the left. I use waste canvas motifs usually to cross seams, but that doesn't work when some of the elements are small white blobs - they would have been better served by having the dark purple all around them.

But all in all - a nice design, I will put it in my folder and it will probably get used time and again in the future. I love Lily of the Valley (and I know its leaves are usually blue-greens, not grass greens, but I couldn't quickly find that thread combination)

Saturday 5 February 2005

Cuppa Anyone?


Cuppa Anyone?
Originally uploaded by LindaB.
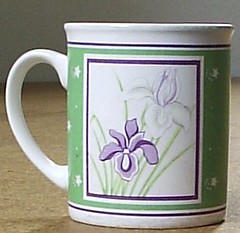
Bought myself a mug the other day to take to classes. Guess what colour it is???

Anyone for a cuppa (says she, in Suffragette mode)

Old Quilt / Stitch Combinations


Jigsaw-bottom-left
Originally uploaded by LindaB.
Yes Maureen C, this is an old photo I am about to reuse. I had it on my website a few years ago, but had to remove it due to space constraints. Now I am putting it on flickr, so you can all have a look - as I try and work out some of the brilliant stitch combinations.

I am starting with an easy one - the Cretan Stitch and Fly Stitch on the bottom left. It is going on my Suffragette block, which I am working on at the minute - but nothing to show off as yet. Soon.

Wish I knew more about this quilt - I think it has a date of 1897 on it, but I don't know if it is in a private or public collection - I assume USA, although I have lost the box. I only know it as a jigsaw. I shall put the other four corners up in time. In the meantime, I am off to stitch.

Closeup of Catherine's DYB


Closeup of Catherine's DYB
Originally uploaded by LindaB.
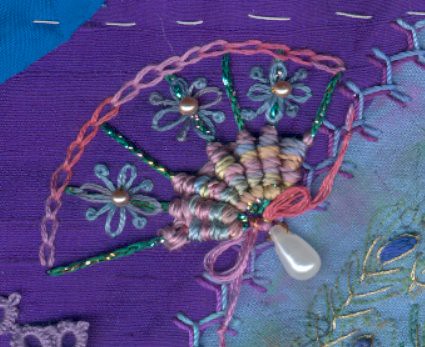
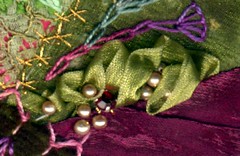
I just couldn't stop myself with doing some more on Catherine's DYB (Doing Your Block). I had some lovely, oyster-coloured cultured pearls from a string I got in a junk box, so I used some of the smallest, with a fake ruby and sewed them on with gold Madiera Metallics. I think they look rather nice. Just like pearls spilling out of seaweed.

Friday 4 February 2005

The first of the Quilts of Understanding

Not a lot to report today, but I have got the Quilts of Understanding page back up again. Although some of the links are out of date, and I have yet to work on them. Hopefully that will happen soon.

These quilts were made in Wellington Shire several years ago for the International Day of People with a DisAbility. We gave out lots of calico squares and waited until they came back - there is much more about them on the website.

My square is in the left-hand row, in the middle. Yep - purple, green and white!

This post is also because I am experimenting with editing posts from within flickr to add links - the learning curve progresses!


This is the project that gave birth to my current project - where the Suffragette block is headed - the Quilts of Unity

Thursday 3 February 2005

Joan's Bear


Joan's Bear
Originally uploaded by LindaB.
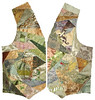
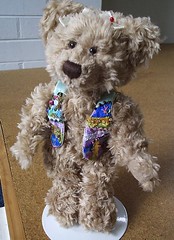
I have just come back from my first class with my CQ group for the year, and some of the things they have been working on are sensational. So I will slip some in as the opportunity arises. This is Joan's bear (which I think is a commercial Teddy), but she has made him this glorious little CQ vest. He is about six inches high, nine inches at the most, so you can imagine the size of his vest.

Annie's Back!!!!!

How wonderful - I don't know when it happened - but Annie is back.

And blogging again. And thanks to Sharon for the news!

And that is all I have time to say at the minute - my classes start again today, and I will have somewhere around ten ladies with a lot of catching up to do. With heaps and heaps of show and tell and all sorts of other news.

Wednesday 2 February 2005

Suffragette block


Suffragette block
Originally uploaded by LindaB.
I'm still having a bit of a hassle working out how to post photos from flickr to this blog, but I AM getting there.

This is a sort of test post - this is my Suffragette Block that I keep talking about - the colours on my screen are rather blue-ish, but they are actually purple, green and white.

It is designed to go in a Community Quilt, and I was also experimenting with curves, rather than flip-and-sew. It is a bit of both.

I hope that if you click on the photo it will take you into the photo in flickr. Then, on the left of the photo you will see tiny icons - one is "view all sizes". If you use that you will get a choice of "large", which should show more detail. Hopefully!

If that works, I will have another go at getting Catherine's DYB up in detail. Yep, Maureen C, it sure is a learning curve. But if I can jump this hurdle it would be good, as I am currently putting photos on my webspace, and it is full!

Catherine's DYB finished

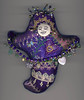
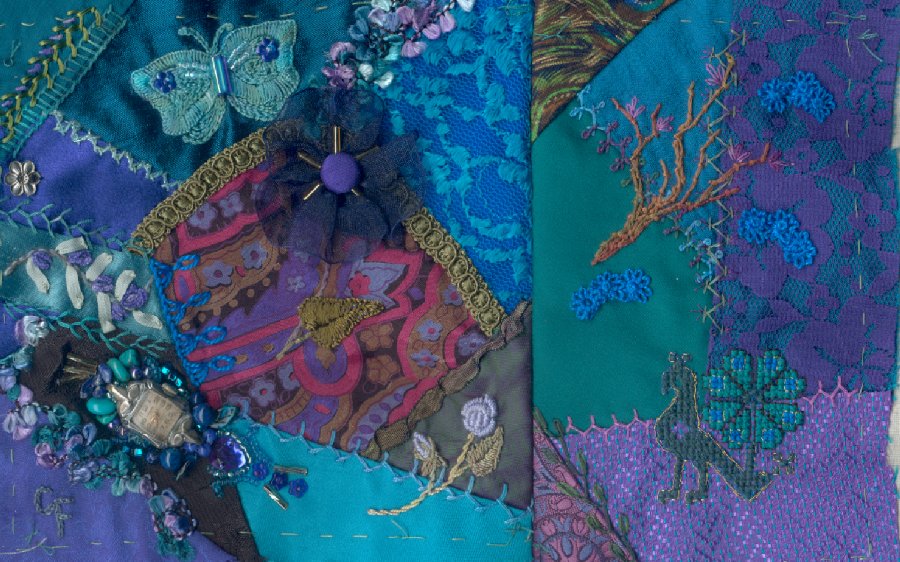
Catherine's DYB is now finished - one commitment written off (I am dividing up into commitments and UFOs - commitments are for other people, or have other people waiting for them [deadlines], UFOs are things for me, that are seductive in that they don't have deadlines).

This has been a beautiful block, as it is very 3D and irregular. The 3D I had to address, the irregular will be Catherine's challenge when she gets it home. Hopefully people will be able to see the set develop on Peggy's Forum - you need to be signed in to see the pictures, then go to the Doing Your Block Forum.


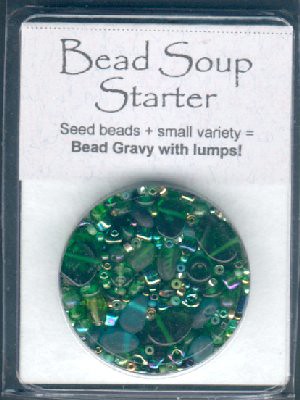
The central part of the embellishing is a rose from a Semco miniature, using waste canvas, and the pink flower near the tatting is an ear-ring that told me it had to go there. But the most fun I had was with the top lefthand corner. It was already very 3D, so I cut a slit in the front, poured in a mix of two different coloured seed beads and then feather-stitched the slit shut and used it also to divide the area up and give texture.

Just looking - maybe it isn't finished yet. I think I could "hide" a few tiny beads and a "gem" in that green ruffle bottom right.